Sunday, June 2, 2013

Full disk solar images...again..and the DMK41 adapter debacle...

The PST is a great scope for the money, but damn...imaging was the last thing on their minds when they designed it. There are only two ways to obtain focus when imaging through a PST: Barlow, and short, shoulderless nosepiece about 25mm in length. I had got my my raise backpay at work and as luck would have it, it allowed for the purchase of a DMK41 from The Imaging Source. I was hoping to do some full disk shots.

I ordered a shoulderless c-mount nosepiece from OPT and had it in my head that in order to facilitate the new nosepiece that I would have to remove the c/cs adapter ring from the camera housing. Apparently in the past, these little guys just unscrewed from the housing, but modern incarnations have two set screws holding the adapter ring in place. This is important because while researching this I found tons of posts saying that you had to remove the adapter, but none mentioned anything about the setscrews. Users at the Solarchat forum got me squared away on the info and one screw came out without issue. The other woudn't bite (it was a regular type screw needing a tiny blade type screwdriver, but half the head was missing and the blade tip couldnt bite). I tried drilling it out to no avail. I attempted to remove the ring with pliers, but I only got it about three revolutions before irreversibly locking. After much stress and heartache, I accepted that the adapter ring would never be removed. As it turned out, the new nosepiece came in and it threaded right into the small thread. Guess it didn't need to come out after all, which is a good thing.

I didn't have a vice at the house, and let me tell you that trimming the nosepiece with a hacksaw was a short. I got it done though, and despite the fact that it is ugly as hell, it does work nicely.

Here are today's results: Setup is DMK41 and stock PST on a SmartEQ mount. 1539UT / composite for proms and disk detail..


As you can imagine, I am very happy. The DMK41 performed as expected, nothing to note against the past performance of my old DMK21. Barlowed images do have the occasional newton rings, but usually they can be dealt with. Not bad despite the PST being one of the most difficult scopes to image with.

Sunday, April 21, 2013

Some deep sky goodies with the 80mm achro and mallincam

I decided on a whim to setup the 80mm achro with the mallincam on Friday night, and here are the results. With Orion setting so fast in the evening these days, I did not get my cam/laptop combo up and running in time to catch the Hunter before he set behind the house, so I decided to go trolling for deep sky targets. Bear in mind, with a measly 80mm of aperture and only 14 seconds of exposure, pickings were slim. I didn't have the magnification necessary for any globular clusters, and moonlight didn't do DSO's any favors. I did however have a little bit of luck with some brighter messier objects. The following images were taken with an Orion short tube 80mm achro refractor, a mallincam color hyper imager, celestron UHC/LPR filter, and an iOptron smartEQ mount. Generally these were DSS stacks of 5-10 frames with 2 dark frames applied. Levels, curves, etc.. in photoshop.


M81 and M82 galaxies in Ursa Major. I was really impressed with this show and how well it showed up on this modest setup.


M37 open cluster in Auriga. The color noise was so bad on this I switched to monochrome and adjusted the gamma for a cleaner picture.


This is the Eskimo Nebula (NGC-2392) in the constellation Gemini. It is a planetary nebula, and with larger aperture can show some slight color at the eyepiece.


That's about it, the cold damp air did me in for the evening. I am again amazed at what can be done with a cheap 100 dollar scope and a mallincam. 


Tuesday, March 19, 2013

Orion ST80 + Mallincam = great fun!

I am really, really enjoying this Orion ST-80 short tube refractor. I had no idea how much I would enjoy a grab-n-go scope. This little scope when paired to the iOptron SmartEQ mount provides an immensely fun little package. I just grab the scope on the mount, take it outside, point to true north with a map compass, and switch on. I slew and sync on several bright targets and nothing but enjoyable viewing for the rest of the session. I love the wide FOV that this scope provides with an astro-tech 15mm plossl. Chromatic Aberration is minimal and certainly does not distract from the view. Moon filter kills CA fringing as several online reviews state, and does so very well. I cannot overstate how pleased I am with the views that this little cheap scope provides. I can see the whole sword region of orion in the 15mm FOV. It is a very satisfying view, and I would not have thought so given the fact that it is a measly 80mm of aperture. Despite that, I find myself glued to the eyepiece for long periods of time enjoying the razor sharp views of M42. Am I becoming a refractor convert? Possibly a little bit, but I do enjoy a big dob as well. I am just saying that this little mount/scope combo is really fun and provides tack-sharp rewarding views. It has really put the fun factor back in astronomy. In fact, if I am not imaging, I can be setup, aligned, and observing in about three minutes. Just fantastic.

I know this little cheap scope won't be an imaging superstar, but I was curious what it would look like with the Mallincam Color Hyper imager. Video astronomy is fun, no doubt about it but I wanted to see what it would do with some screen grabs. Lazy man's astrophotography, if you will. Yes, I knew there would be star bloat, yes there were telltale purple halos that come with chromatic aberration, but you know what? The images were pretty cool and really can showcase what can be done with a cheap scope, mount combo.

I setup last night in hopes of catching Panstarrs, but no luck as it was too low and trees obscure my western horizon. I decided to swing the scope over towards Orion's sword, and here are the results. I look forward to trying this again during a new moon and with a Baader IR filter to help contain some of the star bloat. All in all though, I was very pleased.


The above image is the result of 8x2 second exposures (sens-up setting 128x) stacked in DeepSky Stacker. Curves, levels, saturation adjusted in PS, as well as a few passes in the astro tools action panel.


The above image is the result of 4x2 second exposures and the on-camera zoom function on at full zoom. DSS stacking and curve/level/astrotools action panel in PS.


The above image is a stack of 2x7 second exposures. Overexposed to show some detail in the gas cloud surrounding the trapezium. Core is blown out but cloud details are present. You can even see a hint of the "Running Man" nebulosity below m42. Heavily edited in PS just to be even somewhat presentable.


It took longer to fire up the laptop and setup the mallincam and video capture software than to get the scope setup and aligned. Much fun and I think this will be a hit for a portable outreach setup. I am anxious to see how the cam performs with this scope when using a LP filter, I hope it helps without degrading the images too much. I also tried to image the Pleaides, M45 but the starbloat was too bad and the image was completely washed out by light pollution. 

Until next time...


Saturday, March 16, 2013

Fun with Orion ST-80 and SmartEQ

Being disappointed with my images of PANSTARRS comet, I decided to try to put together something with a little more ooph. I didn't relish the thought of lugging my C8/Sirius combo to my spot south of town for a brief window of imaging the comet, so I wanted something a lot more portable. I took the Orion short tube 80 achromatic refractor and mounted it on a spare dovetail. I tried it out last night with the iOptron SmartEQ mount. Haze and thin clouds made the comet a pointless target, I couldn't even see it with binos, but I did take the rest of the evening to enjoy the little refractor before the clouds and wind shut me down. 

I have to say that I really had fun. I didn't expect to enjoy the little el-cheapo refractor as much as I did, and despite the chromatic aberration present as expected, the views were really impressive to me. I have no experience with APO or semi-APO ED refractors, but I did enjoy this cheap little scope. I didn't spend too much time polar aligning (just pointed north and threw caution to the wind). Visual tracking was great and after syncing on the moon and M42, goto's were surprisingly good, even on the other side of the meridian without any sync'd targets to the east. Mizar was dead on after slewing from m45. Oh yeah, m45 and m42 kept me glued to the eyepiece for over an hour. So much fun to have a scope setup that doesn't herniate me to setup and can be setup and slewing in about 3 minutes. Really put some fun back into astronomy for me.

I hope in the next several days that I have some luck with using it with the mallincam (focus with extension tube) and comet PANSTARRS. Of course I will post up results!


Let me again take the opportunity to praise the iOptron SmartEQ mount. It is so much fun, and it just works. It's light weight and super quick setup makes it a blast to use. The short tube 80/ SmartEQ combo is wonderful and means I will be able to observe and possibly do some minor imaging on a whim vs. a 1 hour setup. 


Comet PANSTARRS C/2011 L4

Here are my results on March 11/12 2013. Equipment used: Nikon D-60, 18-55mm kit lens, standard photo tripod.


Closeup of first image, gamma/cont. tweaked in PS


Quick 10 sec. exp. of Orion before packing it in on the 11th. No tracking, just DSLR on tripod.


Although I am happy that I did capture the comet with the 18-55mm kit lens, it is of such low resolution that I can barely make it out. Use what you have....and I did, however I crave the nice images like I have seen around the internet. With that in mind I have repurposed my Orion guidescope package for use with the smartEQ mount from iOptron in hopes of getting some good up close comet shots. See next blog entry for details.


Saturday, February 23, 2013

DIY tilt adjuster and first test

Well, I tried to use the Orion SSAG mono imager with the PST. VideoSky worked pretty well, but in the end it wasn't meant to be. The images were plagued by a nasty interference phenomenon that occasionally rears it's ugly head with h-alpha imaging. It is known as newton's rings. Common thought is that it is a form of optical interference with the light bouncing back and forth between parallel surfaces in the optic train. The usual cure for this is rotating the imager in the tube. For more severe cases, a slight tilt off-axis is required. I cobbled together a homemade tilt unit and gave it a shot. Here is the tilt unit I made..

The tilt is controlled by three screws. Pretty simple design, actually. Unfortunately, testing this morning proved that no amount of rotation or off axis tilting would cure the dreaded interference. Newton's rings were still present in the image. See below:

The light area at the top of the screen is also a result of using the videosky program. I couldn't get rid of that either, no matter what camera setting I used. I hate to admit defeat, but using the SSAG camera is a complete and dismal failure with the PST. Researching the problem online shows that this problem is quite common with monochrome imagers with the Micron chipset. The interference seems to be native to the chip itself. Unfortunately that means that there isn't a dang thing I can do about it. Time to save up for a DMK21. Back to the drawing board...

Monday, February 11, 2013

First light with PST/SmartEQ combo, also Orion SSAG working as imager


Well since fixing the iOptron SmartEQ mount, I finally got to put it through it's paces for solar imaging. I must  say that I am extremely impressed with the tracking ability of this little mount. It is almost like the PST and SmartEQ were a match made in heaven (pardon the pun). First off, I did a really lazy polar alignment. I took my compass on my iphone 4 and placed it in the accessory tray. Found what it said was magnetic north and I guestimated what I thought should be 6 degrees deviation for true north. That's it! Nothing more. Knowing that the goto would be off but figuring it would probably be in the neighborhood, I did a goto slew to the sun. It was only a couple degrees off. I won't say perfect tracking, but only the slightest corrections were needed to keep the sun centered, and they really were infrequent. Another plus was I accidentally kicked the tripod leg knocking the whole mount from it's original position by several inches. I just wiggled the mount until the sun was in the finder again and fine tuned centering the sun. Another several hours of worry free tracking. I never got this kind of tracking accuracy when using the NexStar 8 mount for solar observing, even when I synced on the sun.

I know that it goes without saying, but viewing the sun on a stable mount was so much more pleasant. Using the rickety photo tripod that I had, it was maddening to attempt focus. I finally got a razor sharp focus for the first time since I purchased the PST. Everything seemed to be going my way so I thought I would pop in the DBK21 imager and have a go at some solar imaging. I quickly found out that it would not achieve focus. I tried to use a barrel extension tube but also did not have any luck with achieving focus. I popped in an Astrotech 2x short barlow and focus came. I was impressed with the fact that the images that I obtained with the PST were on par with my first images with the Lunt 60tha when using a color imager. Here is the best of the batch from yesterday's session. It is a composite of two images, one exposed for prominence detail and the other for disk detail. The huge prominence visible was really contrasty, even in the eyepiece. Not bad considering the detail that one can expect when using a color imager to do h-alpha imaging:


And another shot showing an active region:


Not bad at all, and certainly on par with the detail I obtained with my Lunt prior to getting a monochrome imager. That being said, I was spoiled to the detail that I obtained when using the mono imager and I just cannot go back to using a color imager for solar imaging. Quick little lesson to break down why mono imaging is better for H-alpha. Color imagers use what is known as a Bayer Matrix. Basically it is a microlens with red, green and blue elements. Red accounts for 25% of the matrix, and hydrogen alpha light is very narrow in wavelength, typically less than one angstrom for h-alpha scopes. This narrow slice of light is only in the red portion of the spectrum and as such, only is collected by red pixels in the Bayer Matrix. Since that is only 25%, you effectively decrease the resolution of the camera/imager by 75% when using it to image hydrogen alpha light. Monochrome imagers have the edge for h-alpha solar imaging because they can utilitze 100% of their pixels.

Since this is my "budget" solar rig, I really do not wish to plunk down $350+ for a mono imager again. I do have the Orion Starshoot Autoguider camera which has a 1/2 inch 1.3MP monochrome CMOS chip. This camera from Orion is meant to be used with the PHD software and is controlled with ASCOM drivers. Attempting to use this camera with other capture software is futile as it won't even be recognized by the software. I was doing some research and found out that the Orion SSAG camera is actually a QHY-5 camera in Orion clothes. As such, it should be possible to download the driver to make it work as an imager the same way that it's European cousins do. The problem with this is that I still intend to use it as an autoguider with PHD software and I do not wish to uninstall/reinstall different drivers everytime I wish to use the camera for a different purpose. I asked a few questions on Cloudy Nights, and was directed to the following page which has a free software download that will let you use the SSAG camera as an imaging camera without having to install new drivers. The name of the program is VideoSky 2011 by Emmanuel Rietch. It can be downloaded at the following link:


After installing this software I immediately had an issue with it detecting the SSAG imager. It would generate a "buffer overrun" error and shut down the program. Reading the site, it says that it isn't compatible with Windows 7 64bit (my imaging laptop's OS). I launched the program again in compatibility mode (winXP) and it fired right up. VideoSky detected the Orion SSAG camera and I was able to get an image.

I am on vacation all week so hopefully I will get a chance to image with this camera. Being monochrome and being a larger chip I hope to rectify my resolution issues. I am optimistic as there are many good examples of H-alpha imaging using the QHY-5 (this camera's european cousin). I will post up some images if I am successful, I am really hoping I don't have to shell out for another mono imager.


Saturday, January 26, 2013

iOptron Customer Service is the best

At the last OKCAC meeting I got a great deal on an iOptron SmartEQ from a fellow club member. This really is a neat little mount and although it is small, it really has a lot of neat features. While setting it up for the first time, the declination motor went out. I emailed iOptron about the feasibility of replacing it. The techs were very helpful, and sent me instructions to diagnose whether it was a bad motor or a bad mainboard. As it turns out, it was just the motor. I obtained another for a very reasonable price (50.00) and the assembly came ready to install. The unit is completely self contained and designed to be drop in and plug-and-play. The motor comes with all necessary gears already meshed. All that is required is to back up the tension bolts on the mount, take off the motor tension holder, replace the unit, and snug everything back up. Took me about a half hour to replace it. Fired it up and it works perfectly. I couldn't be happier.

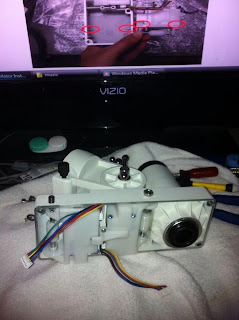
Here is the SmartEQ disassembled. The dec motor assembly is on the right hand side:


The process was straightforward, the ioptron tech even sent me a .pdf file with step-by-step instructions and photos to do the motor replacement. They even offered to fix it for me if I would just send the mount in. Thankfully that wasn't necessary but I was really amazed at how helpful they were. They knew I bought the mount used and went above and beyond to help me diagnose the problem and assist me with fixing it. That kind of support was just amazing. No doubletalk or red tape, just genuine help. They just earned my future business when it comes to mounts.

At any rate, here is the whole setup ready for first light: