Saturday, February 23, 2013

DIY tilt adjuster and first test

Well, I tried to use the Orion SSAG mono imager with the PST. VideoSky worked pretty well, but in the end it wasn't meant to be. The images were plagued by a nasty interference phenomenon that occasionally rears it's ugly head with h-alpha imaging. It is known as newton's rings. Common thought is that it is a form of optical interference with the light bouncing back and forth between parallel surfaces in the optic train. The usual cure for this is rotating the imager in the tube. For more severe cases, a slight tilt off-axis is required. I cobbled together a homemade tilt unit and gave it a shot. Here is the tilt unit I made..

The tilt is controlled by three screws. Pretty simple design, actually. Unfortunately, testing this morning proved that no amount of rotation or off axis tilting would cure the dreaded interference. Newton's rings were still present in the image. See below:

The light area at the top of the screen is also a result of using the videosky program. I couldn't get rid of that either, no matter what camera setting I used. I hate to admit defeat, but using the SSAG camera is a complete and dismal failure with the PST. Researching the problem online shows that this problem is quite common with monochrome imagers with the Micron chipset. The interference seems to be native to the chip itself. Unfortunately that means that there isn't a dang thing I can do about it. Time to save up for a DMK21. Back to the drawing board...

Monday, February 11, 2013

First light with PST/SmartEQ combo, also Orion SSAG working as imager


Well since fixing the iOptron SmartEQ mount, I finally got to put it through it's paces for solar imaging. I must  say that I am extremely impressed with the tracking ability of this little mount. It is almost like the PST and SmartEQ were a match made in heaven (pardon the pun). First off, I did a really lazy polar alignment. I took my compass on my iphone 4 and placed it in the accessory tray. Found what it said was magnetic north and I guestimated what I thought should be 6 degrees deviation for true north. That's it! Nothing more. Knowing that the goto would be off but figuring it would probably be in the neighborhood, I did a goto slew to the sun. It was only a couple degrees off. I won't say perfect tracking, but only the slightest corrections were needed to keep the sun centered, and they really were infrequent. Another plus was I accidentally kicked the tripod leg knocking the whole mount from it's original position by several inches. I just wiggled the mount until the sun was in the finder again and fine tuned centering the sun. Another several hours of worry free tracking. I never got this kind of tracking accuracy when using the NexStar 8 mount for solar observing, even when I synced on the sun.

I know that it goes without saying, but viewing the sun on a stable mount was so much more pleasant. Using the rickety photo tripod that I had, it was maddening to attempt focus. I finally got a razor sharp focus for the first time since I purchased the PST. Everything seemed to be going my way so I thought I would pop in the DBK21 imager and have a go at some solar imaging. I quickly found out that it would not achieve focus. I tried to use a barrel extension tube but also did not have any luck with achieving focus. I popped in an Astrotech 2x short barlow and focus came. I was impressed with the fact that the images that I obtained with the PST were on par with my first images with the Lunt 60tha when using a color imager. Here is the best of the batch from yesterday's session. It is a composite of two images, one exposed for prominence detail and the other for disk detail. The huge prominence visible was really contrasty, even in the eyepiece. Not bad considering the detail that one can expect when using a color imager to do h-alpha imaging:


And another shot showing an active region:


Not bad at all, and certainly on par with the detail I obtained with my Lunt prior to getting a monochrome imager. That being said, I was spoiled to the detail that I obtained when using the mono imager and I just cannot go back to using a color imager for solar imaging. Quick little lesson to break down why mono imaging is better for H-alpha. Color imagers use what is known as a Bayer Matrix. Basically it is a microlens with red, green and blue elements. Red accounts for 25% of the matrix, and hydrogen alpha light is very narrow in wavelength, typically less than one angstrom for h-alpha scopes. This narrow slice of light is only in the red portion of the spectrum and as such, only is collected by red pixels in the Bayer Matrix. Since that is only 25%, you effectively decrease the resolution of the camera/imager by 75% when using it to image hydrogen alpha light. Monochrome imagers have the edge for h-alpha solar imaging because they can utilitze 100% of their pixels.

Since this is my "budget" solar rig, I really do not wish to plunk down $350+ for a mono imager again. I do have the Orion Starshoot Autoguider camera which has a 1/2 inch 1.3MP monochrome CMOS chip. This camera from Orion is meant to be used with the PHD software and is controlled with ASCOM drivers. Attempting to use this camera with other capture software is futile as it won't even be recognized by the software. I was doing some research and found out that the Orion SSAG camera is actually a QHY-5 camera in Orion clothes. As such, it should be possible to download the driver to make it work as an imager the same way that it's European cousins do. The problem with this is that I still intend to use it as an autoguider with PHD software and I do not wish to uninstall/reinstall different drivers everytime I wish to use the camera for a different purpose. I asked a few questions on Cloudy Nights, and was directed to the following page which has a free software download that will let you use the SSAG camera as an imaging camera without having to install new drivers. The name of the program is VideoSky 2011 by Emmanuel Rietch. It can be downloaded at the following link:


After installing this software I immediately had an issue with it detecting the SSAG imager. It would generate a "buffer overrun" error and shut down the program. Reading the site, it says that it isn't compatible with Windows 7 64bit (my imaging laptop's OS). I launched the program again in compatibility mode (winXP) and it fired right up. VideoSky detected the Orion SSAG camera and I was able to get an image.

I am on vacation all week so hopefully I will get a chance to image with this camera. Being monochrome and being a larger chip I hope to rectify my resolution issues. I am optimistic as there are many good examples of H-alpha imaging using the QHY-5 (this camera's european cousin). I will post up some images if I am successful, I am really hoping I don't have to shell out for another mono imager.


Saturday, January 26, 2013

iOptron Customer Service is the best

At the last OKCAC meeting I got a great deal on an iOptron SmartEQ from a fellow club member. This really is a neat little mount and although it is small, it really has a lot of neat features. While setting it up for the first time, the declination motor went out. I emailed iOptron about the feasibility of replacing it. The techs were very helpful, and sent me instructions to diagnose whether it was a bad motor or a bad mainboard. As it turns out, it was just the motor. I obtained another for a very reasonable price (50.00) and the assembly came ready to install. The unit is completely self contained and designed to be drop in and plug-and-play. The motor comes with all necessary gears already meshed. All that is required is to back up the tension bolts on the mount, take off the motor tension holder, replace the unit, and snug everything back up. Took me about a half hour to replace it. Fired it up and it works perfectly. I couldn't be happier.

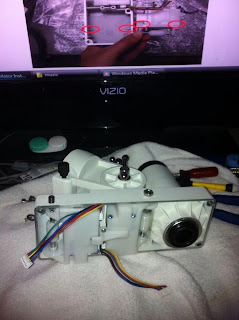
Here is the SmartEQ disassembled. The dec motor assembly is on the right hand side:


The process was straightforward, the ioptron tech even sent me a .pdf file with step-by-step instructions and photos to do the motor replacement. They even offered to fix it for me if I would just send the mount in. Thankfully that wasn't necessary but I was really amazed at how helpful they were. They knew I bought the mount used and went above and beyond to help me diagnose the problem and assist me with fixing it. That kind of support was just amazing. No doubletalk or red tape, just genuine help. They just earned my future business when it comes to mounts.

At any rate, here is the whole setup ready for first light:


Sunday, December 30, 2012

Back in the Solar Club and other updates

Well my friends it has been a long time since I updated my blog. An update to the current state of my scope and mount is that I believe I have pushed past the AP load limit on my mount. With the ST80 and SSAG and mounting gear, my scope is pushing around 19 pounds. The stock counterweight bar on the Sirius EQ-G isn't long enough to properly balance with 2 11lb counterweights, so I need to look into a counterweight bar extension from scopestuff. I tried sandwiching a 2lb weight between the 11lb weights, but there is too much slop and it makes balancing the mount difficult. I am kindof at a standstill until I can extend the counterweight bar, or I will have to dump the ST80/SSAG setup. Hoping I can upgrade to an Atlas this tax season.

Another reason for infrequent updates is work has been keeping my highly busy and highly stressed. 12-14 hour days are not uncommon and at the end of the day I just don't have the energy to lug all the gear outside and orchestrate everything to play nice with each other and work properly. I regret it too, as Jupiter is in prime position for imaging and I have let way too many good evening slip by as I was simply too exhausted. I hate my job for this very reason.


The real reason for this update is to let everyone know that I am back again in the h-alpha club. I have purchased a used Coronado PST from a gentleman and it should be here this week. A lot of folks have commented that I will be disappointed with the PST based on my previous experience with the Lunt LS60tha. During a solar outreach earlier this year, I had an opportunity to look through a fellow OKCAC member's PST. With mine setup close by, I was able to get a good handle on the difference in visual performance between the two scopes. I can honestly say that the PST was a very good performer, and that the difference was only slightly in favor of the Lunt 60. I remember thinking to myself that the negligible difference in view certainly did not constitute almost 500.00 dollars in price difference. So while I know that the Lunt I had just barely beat the PST in visual performance, I think the PST will satisfy my solar observing needs for a long time. My only fear is that PST performance can vary from scope to scope, and I hope I get a good one compared to the one I got to use last summer.

Another challenge to overcome before doing any serious imaging is that I have sold off all of my solar gear associated with the Lunt. I will need to purchase or cannibalize another tracking mount and I should probably be looking at another monochrome imager such as the DMK21. I do have a DBK21AU4 that I can use, but due to the restrictions of imaging h-alpha, a monochrome imager is ideal for using full resolution. I really cant wait to look at the sun again, it has been way too long.

Updates to follow more frequently I hope.

Sunday, September 16, 2012

Scope Upgrades

Sold the CG-5asgt and my other 8" deforked SCT. Used the proceeds to prep my scope for the Orion Awesome Autoguider Package (which will be here next Tuesday). I upgraded the finder to the ubiquitous Telrad, and added the signature orange Celestron losmandy D dovetail rail. I also purchased 2 astrotech losmandy-d rail adapters that I am going to mount the guidescope rings on. There were several reasons why I decided to use this configuration. The vixen style rail that comes with the Orion package is too long for my OTA, so either I cut it and paint the end or leave it on and let it overhang. Either way would look ugly. Also, as the kit comes, it will not be able to be mounted to the OTA. I would have had to buy radius blocks from ADM to give the bar the clearance necessary to mount the rings. Again, expensive and would look hideous. The combination of the celestron bar and astrotech adaptors was around 90 dollars, not much more than just a pair of radius blocks from ADM. I am very happy with this setup and wish the SSAG package was here to install.

Only bad thing? The extra weight has thrown my scope far out of balance. I cannot use my scope again until I order another 11' counterweight. Bummer. Will have to be next paycheck.


Sunday, September 2, 2012

Holiday weekend fun

So I sit here downing a Coors light and putting the finishing touches on the hand controller box for my DIY motorized focuser. I had posted a link a long time ago but tabled the project. After imaging Jupiter the other night with the DBK camera, I decided a motorized focuser was not a luxury item, but rather was an essential needed device. I still think that my final images were a little soft on the focus, so hopefully this will remedy that. Looking at the JMI MotoFocus designs, I figured that the price was just too prohibitive, and since I am always on a low budget, decided to go the DIY route explained in the following two links:

http://emediadesigns.com/emediadesigns.com/focuser/

http://www.cloudynights.com/ubbthreads/showflat.php?Cat=&Board=nexstar&Number=5038166&Forum=,,,,f36,,,,&Words=focuser&Searchpage=4&Limit=25&Main=5038166&Search=true&where=sub&Name=&daterange=1&newerval=&newertype=w&olderval=1&oldertype=w&bodyprev=#Post5038166

I had a bunch of various parts laying around so I decided to tackle the hand controller, which I am glad to report is complete. It really was pretty easy, but as I found out earlier soldering is a frangible skill. After scalding the hell out of my thumb on the iron, I decided I need to do it more often (incident occurred pre Coors light BTW). Only deviation from the above mentioned plans is that I decided to mount the battery container on the outside of the box so that I would not have to unscrew the cover plate if I needed to change the batteries. Being clumsy I also decided to make the box bigger so that I could manipulate the controls easier in the dark. I am pretty happy with the results, now all I have to do is cannibalize a phone or ethernet cable and attach some mono plugs. I then need to obtain a servo and cut the stops out of it so it will work in full rotation. Fashion a mounting bracket to connect to scope and I will be in business at a quarter of the cost of the JMI unit.


I will post updates as I complete the project. 

Saturday, September 1, 2012

First Jupiter of season

Got the Baader UV/IR cut filter in the other day, but work and weather kept me from getting a decent shot at some imaging. Broke that streak last night, and here is the best of the lot. I decided to simply use my OTA on it's original NexStar mount and found out quickly just how much worse an altaz mount is at accurate tracking with high magnifications. Always had to chase it around last night, I guess I got spoiled with the EQ mounts. I should have used my Sirius mount last night, but I wanted quick setup and tear down. At any rate, .avi  sequences averaged around 600+ frames at the 90 second mark. Stack, alignment, RGB alignment, and wavelet processing all done in Registax V6. Scope is C8, camera is original DBK-21.


Focus seemed a little soft. I am working on a DIY Bahtinov mask for fine focus. Couple things were evident as critical for my shopping list last night, though. A 3x barlow and motorized focuser are a must. Flip mirror and illuminated crosshair eyepiece parfocal on the mirror would be REALLY nice as well. Time to start pinching pennies.